Thursday, November 24, 2011

A Sweet Treat

Recently a co-worker of mine brought in some delicious pumpkin whoopie pies. I have had whoopie pies before, but never in pumpkin form. She was willing to part with her reciepe and I was able to come up with an excuse to make some.

My friends decided to move back to Iowa and we planned to get together with them soon. My husband thought it would be good idea to bring them a treat to welcome them back. I agreed and thought since it was pumpkin season that the pies would be a great thing to make.
The recipe is from allrecipes.com. It is a great place to look for recipes, no matter what you are looking for! You can look for traditional dishes there or for not-so ordinary dishes as well. Not only can you find desserts you can find entrees, appetizers etc. When I first saw that on the recipe I was assured it would be good.

The whoopie pies were easy to prepare. It was like baking cookies with frosting the on the inside. Plus you had the added bonus of familar Thanksgiving ingredients like pumpkin puree and pumpkin pie spice.

First you mix the dry ingredients.

Then the wet ingredients.Mix together.
Put on cookie sheets. Bake.

Make "frosting" (or filling if you rather).


Put in refrigerator.
Enjoy!

When we met our friends for the get together they could not wait to dig in. I got rave reviews as well. If your willing to try a new dessert at Thanksgiving I highly recommend the "Mini Pumpkin Whoopie Pies" found on allreciepes.com.

Happy Baking and Happy Thanksgiving!

Sunday, November 20, 2011

Preparing for Winter

It's hard to believe, but winter is coming! It is coming so fast that we got a snowfall just a week ago! Since I work at a school I had the audacity to think that maybe we would have a late start. No such luck....

On a scheduled day off though, I was able to help my husband with the garden by digging up some Canna bulbs.
 They were kind of hard to dig up, the ground being wet and all from the snowfall and having the weather being colder than it has been. But nevertheless I got them up with a shovel instead of a garden trowel.

tools for the job
Cannas are a tropical flower. They do pretty well in Iowa especially in the summer. But they can't survive an Iowa winter so they need to be dug up. I found we increased our bulbs by at least 50%! I guess we can give some away at some point.

My husband is  lucky to have a green thumb, I unfortunately fail at watering plants. So I guess it's good I was able to help him by digging the Cannas up.
the cut off stalks
I hope you all have a good day...keep smiling!
a great increase

Thursday, November 3, 2011

Simple Receiving Blanket Part 2

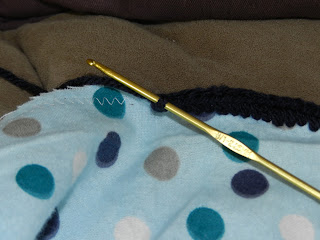
Welcome to the second portion of the "simple receiving blanket" tutorial. The crochet part is a touch harder because you are punching your hook through the fabric while covering the sewing stitches. But it is worth the effort!

I used a US B/1-2.25mm hook and it worked just fine, but a thread crochet hook may be easier on the hands when punching your hook through the fabric.

Stitch glossary:
sc=single crochet
dc=double crochet
shell=three double crochet in space specified
ss=slip stitch
ch=chain
*=repeat

Round 1-Sc under every single point of your zig-zag stitch. Sc until you reach the first sc. Ss in first sc.
 Round 2-Chain 3. 2 dc in same space (Shell created). *Ch 1, Skip 3 sc's and Shell in next space.* Continue * * until you reach first shell, ss and weave in ends.

Round 3 (optional)-after ss,ch 1, sc around blanket until you reach first sc. ss THEN weave in ends.

A round 3 would just finish it off. But it looks good either way (without round 3). But it is up to you. I hope you had a pleasant experience making a wonderfully easy receiving blanket!

Wednesday, November 2, 2011

Simple Receiving Blanket Part 1

Welcome to the sewing portion of how to make a receiving blanket. It was a fast completion, dedicating a whole week to sewing and crocheting them. That is why I have been gone. Anyway, now to the procedure.

First you need to pick out flannel at your favorite fabric store. I chose a flowery one for the little girls and a blue and gray polka dot for the little boy. I wanted to make my receiving blanket square so I purchase 1 1/4 yards of fabric.

This blanket was made with a sewing machine. If you do not have one I'm sure sewing a simple edge around the blanket would work, otherwise if you have one you can use the blanket stitch (if your sewing machine has that option) or since mine did not change it to a zig zag stitch.

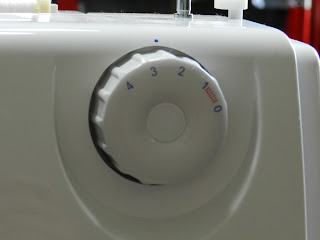
Set up your sewing machine with the appropriate settings for thread tension and stictch. For instance, my thread tension needed to be 3 1/2 for a zig-zag stitch.

thread tension
selected stitch
 Once your machine is set up, cut the "factory edge" around your fabric off. Discard. Place the right side of your fabric under the presser foot.Zig-zag around your fabric, keeping the presser foot close to the edge (this will be helpful later on).

factory edge
Zig-zag completely around the fabric, watching the edge for closeness. After the zig-zag stictch is complete back stictch a few inches and cut off strings.

There you have the start to your receiving blanket!

It was fun to get back on the sewing machine. Even though it has been awhile since I have been on the sewing machine, it was like riding a bike. I was able to get the sewing machine all set up and ready to go with no trouble. I hope you have fun starting this project as I did. Good luck!
Example of the zig-zag stictch